How to Create a 3D Collage Shadow Box Step by Step
Photos and keepsakes can hold special memories, but a simple display may not show their full story. A 3D collage shadow box adds layers, depth, and a personal touch to those items, creating a display you can enjoy for years.
This craft project brings photos, paper pieces, and small keepsakes together in one frame. The right layout, materials, and steps help you build a balanced design that feels personal.
Ready to start your own project? This guide shares each step to create a 3D collage shadow box, from preparing the frame to adding the final details. You will learn simple ways to arrange each piece and create a meaningful display for your home.
What Is a 3D Collage Shadow Box?
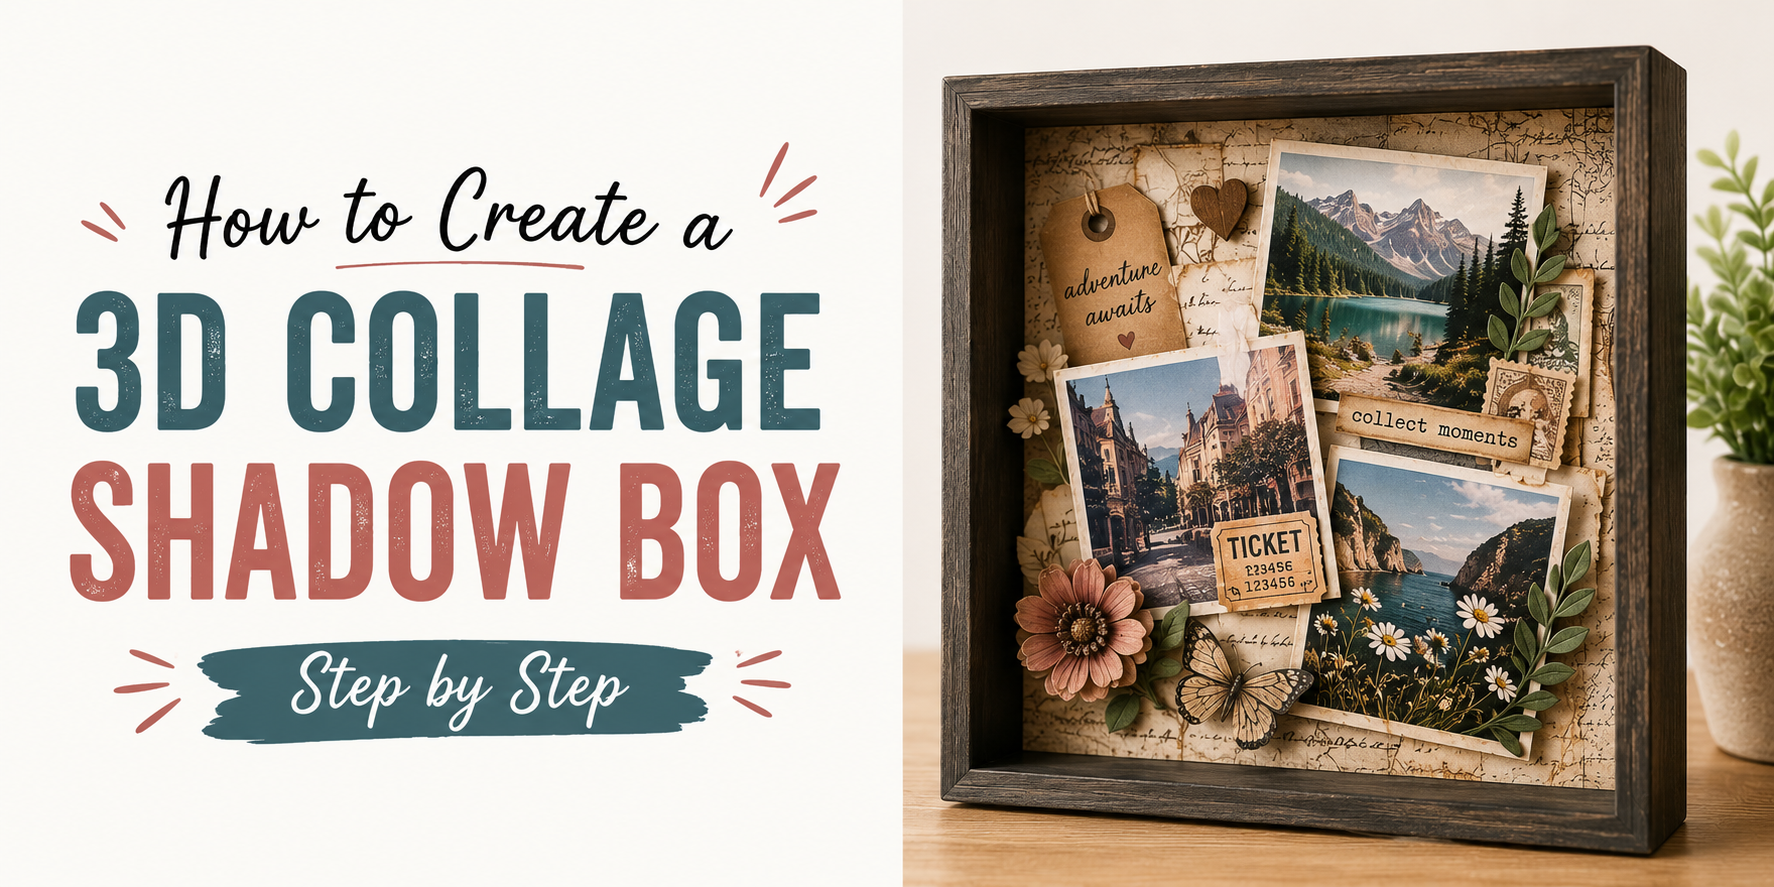
A 3D collage shadow box is a framed display that combines photos, paper designs, small keepsakes, and decorative pieces to create a layered artwork. The box has extra space between the back panel and the glass front, which allows items to stand out and create a raised effect.
This type of shadow box turns simple materials into a special display piece. Layers of paper, pictures, stickers, fabric, or small objects can be arranged to tell a story or match a theme. Each layer adds more depth and makes the design look more detailed. A 3D collage shadow box works well for many projects. It can hold family memories, travel moments, holiday decorations, or handmade artwork. The final piece can be placed on a wall, shelf, or table as a personal decoration.
Why Make a 3D Collage Shadow Box?
A 3D collage shadow box gives you a creative way to keep photos, paper pieces, and small keepsakes in one display. The layered design adds depth and makes each item stand out. This type of project helps turn simple items into a meaningful piece of home decor. You can use ticket stubs, notes, artwork, fabric pieces, or other small items that hold special memories.
A 3D collage shadow box also makes a thoughtful handmade gift. It can be made for birthdays, weddings, holidays, or other special moments. Each box can tell a story through the items you choose and the way you arrange them. Creating your own shadow box lets you choose the colors, layout, and theme. The final piece becomes a personal display that shows your style and the memories you want to keep close.
How to Create a 3D Collage Shadow Box Step by Step
A 3D collage shadow box turns simple photos and small items into a layered display. Each piece adds depth and helps tell a personal story. This project works well for family memories, travel moments, special events, or gifts. Creating one does not require advanced craft skills. With a shadow box frame, printed photos, paper layers, and a few keepsakes, you can build a display that feels personal. Follow these steps to create your own 3D collage shadow box.
Step 1: Prepare the Shadow Box Frame
Start by choosing a shadow box frame with enough space for your layers. A deeper frame gives you more room for photos, paper pieces, and small decorations. Clean the glass and remove any dust from the inside of the frame. Check the backing board and make sure it fits well. A clean base helps your finished project look neat.
Step 2: Create the Background
The background sets the style for your shadow box. Choose paper, fabric, or a printed design that matches your theme. Cut the background material to fit the backing board. Attach it carefully so there are no wrinkles or loose edges. A simple background helps your photos and decorations stand out.
Step 3: Print and Trim Photos
Select photos that match the story you want to share. You can use a mix of large and small photos to create a balanced layout. Print the photos on good-quality paper for a clear finish. Trim the edges with scissors or a craft knife. Try different shapes, such as squares, circles, or Polaroid-style cuts, to add more interest.
Step 4: Add Layered Paper Elements
Paper layers help create the 3D effect. Use cardstock, patterned paper, or cut-out shapes behind your photos. Stack different pieces to add height and texture. Small paper frames, borders, flowers, or shapes can make the design feel more creative. Keep each layer clean so the display does not look crowded.
Step 5: Attach Photos With Foam Adhesive
Foam adhesive creates space between each layer. This small gap gives photos a raised look inside the shadow box. Place foam tape or adhesive squares on the back of your photos. Press each photo firmly into place. Check the position before sticking it down to avoid moving pieces later.
Step 6: Place Keepsakes and Decorative Items
Small keepsakes can add meaning to your collage. Items like ticket stubs, dried flowers, notes, charms, or small souvenirs can become part of the design. Arrange these pieces around your photos. Choose items that match the theme and fit the available space. Too many items can take attention away from the main photos.
Step 7: Add Quotes, Names, or Dates
Personal details make the shadow box more special. Add a favorite quote, a name, a date, or a short message. You can use vinyl letters, printed text, stickers, or handwritten notes. Place these details where they are easy to read. They can help explain the memory behind the collage.
Step 8: Check the Balance and Secure Everything
Look at the whole design before closing the frame. Check the spacing between photos, paper layers, and decorations. Move any pieces that feel out of place. Make sure every item is attached well. A final check helps prevent loose pieces from shifting inside the frame.
Step 9: Close the Shadow Box and Display It
Once everything is secure, place the backing board into the frame. Clean the glass one more time to remove fingerprints or dust. Choose a spot where the shadow box can be seen and enjoyed. A wall, shelf, or desk can be a great place to display your finished 3D collage. It becomes a handmade piece that keeps special memories close.
Read Also: How to Craft a Heartfelt Pet Memorial Shadow Box
Creative 3D Collage Shadow Box Ideas
A 3D collage shadow box can hold many types of memories. Photos, small keepsakes, and decorative pieces can come together to tell a personal story. Each design can match a special moment, hobby, or relationship. Here are some creative ideas to help you plan your own shadow box.
Family Memory Shadow Box
A family memory shadow box is a great way to save moments shared with loved ones. Add family photos, handwritten notes, small souvenirs, or special dates. Layer the items to create depth and make the display feel more personal.
You can include pictures from holidays, family trips, or everyday moments. A simple background with a family name or meaningful quote can complete the design.
Wedding Photo Collage Shadow Box
A wedding photo collage shadow box keeps your special day in one beautiful display. Use wedding pictures, invitation cards, dried flowers, ribbons, or small decorations from the event.
Arrange the photos in layers to create a 3D effect. Add the wedding date, names, or a small message to make the piece unique.
Baby's First Year Shadow Box
A baby’s first year brings many precious memories. A shadow box can hold items like baby photos, hospital bracelets, tiny clothes, first shoes, and milestone cards.
Create sections for important moments from each month. This design helps preserve small details that may be easy to forget over time.
Graduation Memory Shadow Box
A graduation shadow box celebrates hard work and achievement. Include graduation photos, a cap tassel, school colors, certificates, or small school keepsakes.
Place the main photo in the center and arrange smaller items around it. This creates a balanced design that highlights the graduate’s journey.
Vacation Adventure Shadow Box
A vacation shadow box turns travel memories into a creative display. Add travel photos, maps, tickets, postcards, and small items collected during the trip.
Use different layers to separate each memory. A themed background can help show the feeling of the place you visited.
Birthday Celebration Shadow Box
A birthday celebration shadow box saves the joy of a special day. Add party photos, birthday cards, candles, ribbons, or small decorations.
You can design the box around a specific birthday, such as a first birthday, sweet sixteen, or milestone celebration. Bright colors and fun shapes can bring the design to life.
Pet Memory Shadow Box
A pet memory shadow box creates a special place for favorite pet moments. Include photos, a collar, a name tag, paw prints, or a favorite toy.
Arrange each item with care to show the bond you shared. A simple background with your pet’s name can make the keepsake feel even more meaningful.
Friendship Keepsake Shadow Box
A friendship shadow box captures the memories shared with a close friend. Add photos, notes, concert tickets, friendship bracelets, or small gifts.
Use colors and designs that match your friendship. A collection of small items can create a warm reminder of your favorite moments together.
Christmas Memory Shadow Box
A Christmas memory shadow box brings holiday moments into one display. Add family photos, ornaments, gift tags, ribbons, or holiday cards.
Create a festive background with seasonal colors and decorations. Each layer can highlight a different holiday memory.
Seasonal Nature Shadow Box
A seasonal nature shadow box uses natural items to create a calm and artistic design. Add dried leaves, flowers, small branches, or photos from outdoor adventures.
Each season can have its own style. Spring flowers, summer photos, autumn leaves, and winter details can create a beautiful year-round display.
Sports Achievement Shadow Box
A sports achievement shadow box honors a player’s dedication and success. Include team photos, medals, jerseys, tickets, or sports equipment pieces.
Place the main achievement in the center. Smaller items around it can show the story behind the accomplishment.
Minimalist Black and White Collage
A minimalist black and white collage creates a clean and modern look. Use black and white photos with simple backgrounds and a few carefully chosen details.
This style focuses on the memories instead of extra decorations. Layered photos and small textures can add depth while keeping the design simple.
Read Also: 15 Wedding Shadow Box Ideas to Preserve Your Special Memories
Tips for Creating a Stunning 3D Collage Shadow Box
A 3D collage shadow box looks best with a clear plan. Each piece should have its own place and help tell a story. Small choices in layout, materials, and spacing can make the finished piece look neat and personal.
Keep the Layout Balanced
A balanced layout helps every item stand out. Place larger pieces in areas that create a good flow. Spread photos, paper designs, and keepsakes across the box instead of putting everything in one spot. Try arranging the pieces before attaching them. Move items around until the design feels natural. This step helps you find a layout that fits the size and style of your shadow box.
Use Different Layer Heights
Different layer heights add depth to your collage. Flat items can sit in the back, while thicker pieces can be placed closer to the front. Use foam squares, spacers, or small supports to lift certain pieces. This creates a 3D look and helps each detail stay visible.
Mix Photos With Small Keepsakes
Photos bring memories to life, while small keepsakes add a personal touch. Mix both types of items to create a display with more meaning. You can add items like tickets, notes, fabric pieces, dried flowers, or small decorations. Each piece should have a reason for being part of the design.
Choose Acid-Free Materials
Acid-free materials help protect your photos and paper items over time. Regular paper and adhesives may cause damage as years pass. Use acid-free paper, backing sheets, and glue made for craft projects. These materials help keep your collage looking clean and fresh.
Leave Some Empty Space
Empty space gives your shadow box a cleaner look. A box filled with too many items may make each piece harder to notice. Leave small areas open between photos and decorations. This helps guide the viewer’s eyes through the design and keeps the layout easy to enjoy.
Common Mistakes to Avoid
Creating a 3D collage shadow box takes planning and care. Small mistakes can affect the final look and make the display feel crowded or unbalanced. Avoiding these common issues helps create a clean and attractive piece.
Overcrowding the Shadow Box
Adding too many items can make the shadow box look messy. Each piece needs enough space to stand out. A simple layout often creates a stronger visual effect. Choose a few meaningful elements instead of filling every empty spot. Leave some open areas to help the main pieces get attention. A balanced design makes the collage easier to enjoy.
Using a Frame That Is Too Shallow
A 3D collage needs enough depth for all the layers and items to fit properly. A shallow frame may press against the decorations or stop the pieces from creating a layered effect. Pick a shadow box with enough space for your materials. Check the size of your items before placing them inside. This helps prevent damage and keeps the design looking neat.
Placing Heavy Items Without Support
Heavy items can fall, shift, or damage the background if they are not attached correctly. Small decorations may stay in place with simple adhesive, but larger pieces need extra support. Use strong attachment methods that match the weight of each item. A secure setup helps the shadow box stay in good shape over time.
Ignoring Color Harmony
Colors play an important role in a 3D collage shadow box. Too many colors can make the design feel disconnected. Colors that work well together create a more pleasing display. Choose shades that match the theme of your project. Keep the background, decorations, and small details working together. A thoughtful color choice helps every layer feel connected.
Skipping a Test Layout
Placing items directly into the frame can lead to mistakes. A test layout gives you a chance to move pieces around and find the best arrangement. Arrange everything on a flat surface first. Try different positions, sizes, and layers before securing the items. This simple step can save time and help you create a better final design.
How to Display and Care for Your Shadow Box
A 3D collage shadow box adds a personal touch to any space. The right care helps keep your photos, paper pieces, and keepsakes looking good for years. A few simple steps can protect the design and keep the display fresh.
Choose the Right Display Location
Pick a spot where your shadow box can be seen and enjoyed. A living room wall, bedroom shelf, or hallway can be a great choice. Keep it away from busy areas where it may get bumped or damaged. Make sure the wall or surface can support the weight of the shadow box. A stable location helps keep the frame safe and prevents it from falling.
Protect It From Sunlight and Moisture
Direct sunlight can fade photos, paper designs, and other materials inside the shadow box. Place it away from windows or areas with strong sunlight. A shaded spot helps protect the colors and details. Moisture can also damage the items inside. Avoid placing the shadow box near kitchens, bathrooms, or areas with high humidity. A dry space helps prevent paper from curling and keeps the frame in better shape.
Clean the Glass Safely
Dust can build up on the glass over time. Use a soft, dry cloth to remove dust from the surface. This helps prevent scratches and keeps the display clear. For deeper cleaning, use a small amount of glass cleaner on the cloth instead of spraying it directly on the frame. Liquid can leak inside and damage the collage pieces.
Update the Collage Over Time
A 3D collage shadow box can grow with new memories. You can add new photos, notes, small keepsakes, or seasonal pieces to refresh the design. Updating the collage also gives you a chance to rearrange items and create a new look. A shadow box is more than a one-time project. It can become a changing display filled with special moments.
Final Notes
A 3D collage shadow box is a creative way to keep special memories in one place. Photos, paper pieces, and small keepsakes can come together to create a layered display that feels personal. The key to a beautiful shadow box is thoughtful planning. Choose items that tell a story, create a balanced layout, and use layers to add depth. Simple details like names, dates, quotes, and small decorations can make the design feel more meaningful.
This project works for many occasions, from family memories and weddings to holidays, travel moments, and personal achievements. Each shadow box can be different because it reflects the memories and style of the person who creates it. With the right frame, materials, and a little creativity, you can turn everyday items into a handmade keepsake. A finished 3D collage shadow box can become a special piece of home decor that keeps your favorite moments close for years.
FAQs
What items can I put inside a 3D collage shadow box?
You can add photos, paper designs, ticket stubs, notes, dried flowers, fabric pieces, small souvenirs, and other meaningful keepsakes. Choose items that match your theme and fit well inside the frame.
Do I need special skills to make a 3D collage shadow box?
No, you do not need advanced craft skills. A 3D collage shadow box can be made with basic supplies, simple cutting, and careful arranging. Planning the layout before attaching items helps create a neat result.
What type of frame works best for a 3D collage shadow box?
A deep shadow box frame works best because it has enough space for layers and decorations. The extra depth allows photos, paper pieces, and keepsakes to stand out.
How do I create a 3D effect in a shadow box?
You can create a 3D effect by adding layers behind photos and using foam adhesive, spacers, or small supports. Different heights help each piece stand out and give the collage more depth.
Can I make a 3D collage shadow box as a gift?
Yes, a 3D collage shadow box makes a thoughtful handmade gift. You can create one for birthdays, weddings, holidays, graduations, or other special moments by adding personal photos and keepsakes.
How do I protect items inside a shadow box?
Use acid-free materials, secure each item properly, and keep the shadow box away from direct sunlight and moisture. These steps help protect photos, paper pieces, and other keepsakes over time