DIY Holiday Wine Cork Shadow Box Made with Cricut Joy
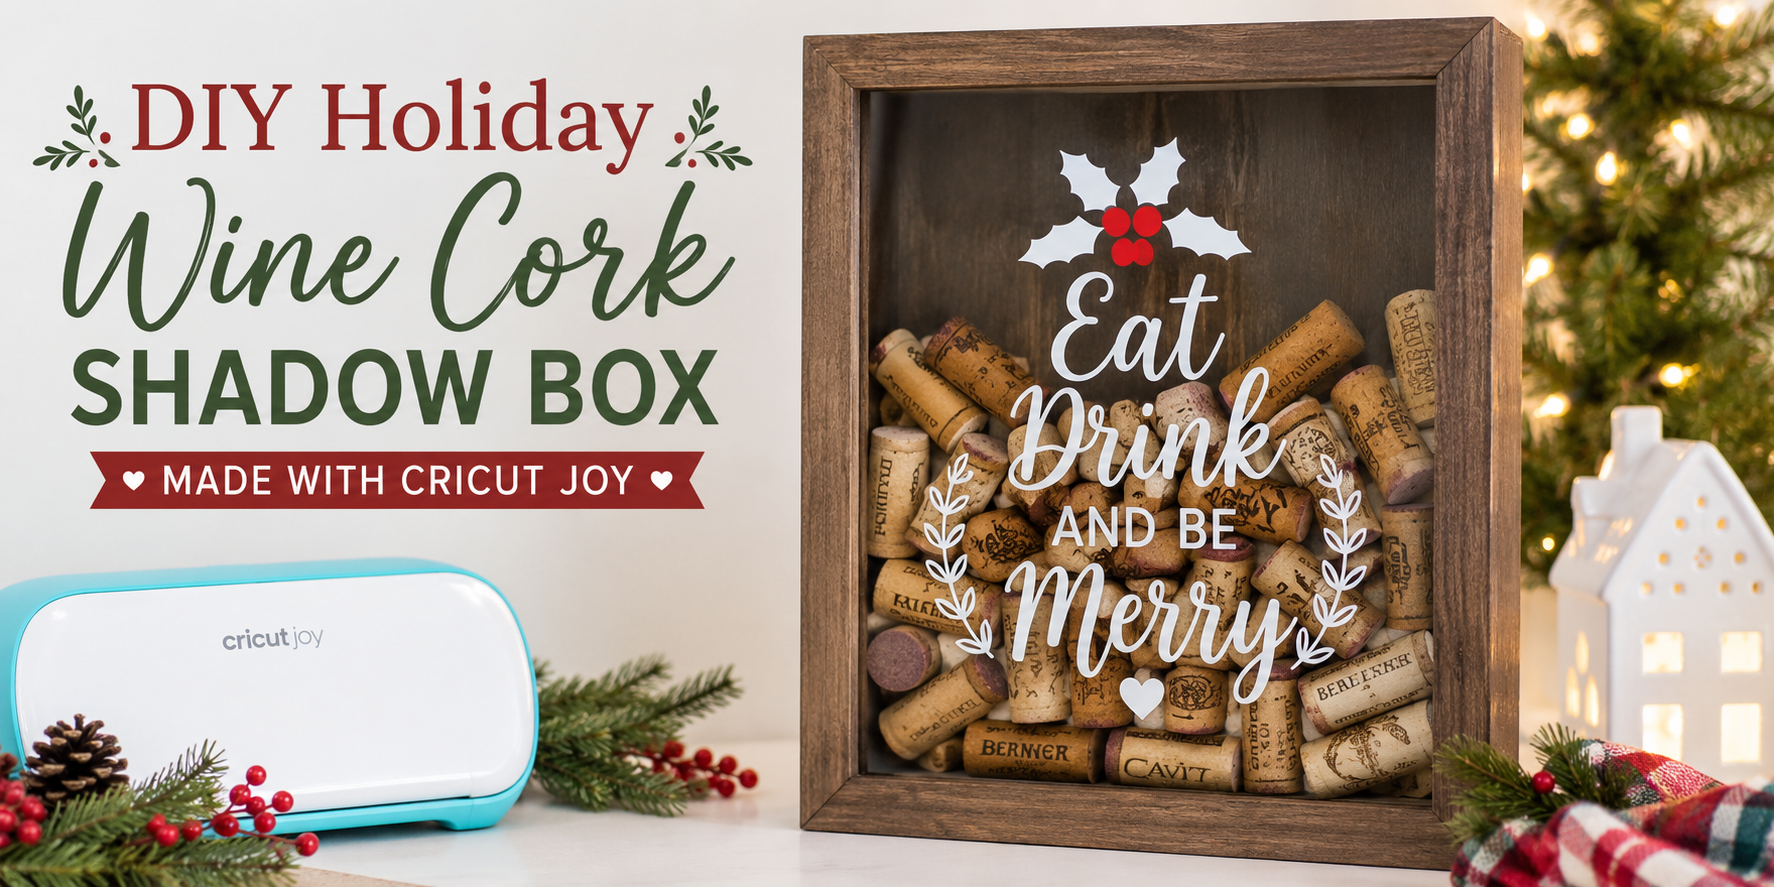
Holiday decor often feels plain on store shelves, yet handmade pieces bring more character to a space during seasonal gatherings. A wine cork shadow box offers a simple way to turn saved corks into framed art that reflects personal moments and holiday memories at home. Next Cricut Joy helps create clean vinyl designs that fit neatly on glass surfaces, making the process easier for beginners and hobby crafters alike. This project brings structure to holiday crafting while allowing space for personal style through fonts, messages, and layout choices that match any home display. Vinyl placement and cork arrangement come together for a finished shadow box using Cricut Joy tools for precise cuts and easy setup at home.
Why This Craft Is Popular for Holidays
Holiday crafting often starts with simple materials. Wine corks fit that idea well. Most people can save a few over time without extra cost. That makes this project easy to begin. The Cricut Joy brings clear cutting and clean shapes. Small details cut neatly without extra effort. That helps even beginners feel confident while building the design.
This shadow box also works well as a gift. A finished piece feels personal. It carries memories from shared meals or celebrations. That adds meaning beyond decoration. Many people also enjoy holiday crafts that do not take up much space or time. This project stays compact and can be finished in short steps. It fits into busy holiday schedules without stress. The mix of recycled materials and simple tools keeps interest high each year. People enjoy turning everyday items into something that feels special for the season.
Cricut Joy in DIY Projects
Cricut Joy helps with small craft work. It cuts paper, vinyl, and other thin materials with clean edges. This makes it useful for detailed project pieces. For a wine cork shadow box, Cricut Joy can cut shapes, letters, and small decorations. These parts help set a holiday theme. You can add names, dates, or simple icons to the design.
The machine is small and easy to place on a desk or table. It works with simple design files on a phone or computer. That keeps the process clear and direct. Wine corks can be arranged inside a shadow box frame. Cut shapes from Cricut Joy can be placed around them to build the final look. The mix of cork texture and paper design gives a balanced display for holiday decor.
Materials Needed
This project brings together simple craft items that work well as a set. Each material plays a role in building the final look. The mix of wood, cork, and vinyl creates a warm holiday feel that fits any home decor style.
Shadow Box and Wine Corks
A shadow box forms the base of this project. It holds the design and keeps everything in place. Pick a size that fits the space you want to decorate. Wine corks add texture and character. They also bring a warm, rustic look to the finished piece. Gather enough corks to fill your design idea.
Cricut Joy Supplies
A Cricut Joy helps cut clean shapes and letters for the design. You will need the machine and its basic setup. Make sure it is ready to use before starting. The design comes out neat and easy to place inside the shadow box.
Vinyl and Tools
Vinyl is used for adding words, shapes, or holiday details. Choose colors that match your theme. A weeding tool helps remove extra vinyl pieces. Transfer tape helps move the design onto the surface without damage. These tools make the process smooth and accurate.
Design Planning
Planning the design sets the direction for the whole project. A clear plan helps the shadow box look balanced and clean.
Choosing a Holiday Theme
Start by picking a holiday focus. Christmas, New Year, or winter season ideas all work well. Pick one mood and stick with it. Warm, cozy, or festive styles each create a different feel. Keep colors and shapes tied to that mood.
Selecting Fonts and Text
Fonts shape the look of the design. Simple fonts read well in small spaces. Script fonts add a decorative touch but should stay easy to read. Limit the number of font styles to keep the design clean. Short words or phrases work best for a shadow box layout.
Layout Planning
Arrange the design before cutting anything. Decide where each element will go inside the box. Leave space between items so nothing feels crowded. Test different placements on screen in Cricut Design Space. A balanced layout makes the final piece easier to assemble and more visually clear.
Creating the Vinyl Design
This part brings the idea to life on screen. The design is built before any cutting starts. Each piece needs the right size and shape for the shadow box. Careful layout helps everything fit well later.
Using Cricut Design Space
Open Cricut Design Space on your device. Begin a new project. Add text and simple shapes for the shadow box design. Pick clean fonts that cut well on vinyl. Set the size based on your frame space. Arrange each part so it stays easy to cut and place.
Cutting the Vinyl
Place the vinyl sheet on the cutting mat. Keep it flat and smooth. Send the design to the Cricut Joy machine. Check the cut settings before it starts. Let the machine cut each shape. Remove the mat after the cut is done.
Weeding and Transfer Prep
Peel away the extra vinyl around the design. Move slowly to keep small details safe. Use a weeding tool for tight spots. Leave only the parts of the design you need. Place transfer tape over the vinyl. Press it down so the design sticks well for transfer.
Assembling the Shadow Box
The shadow box is ready on the table. All parts sit close by. The frame, glass, and backing are in place.
Cleaning the Glass
The glass needs a clear surface. Dust and fingerprints stay out of the final look. A soft cloth works well here. Wipe the glass in slow, even strokes. Check both sides before moving on. A clean surface helps the design stand out. Any smudge can show later inside the frame.
Applying Vinyl Design
The vinyl design comes next. Peel it slowly from the backing sheet. Place it gently on the glass. Start from one edge. Move across the surface step by step. A scraper tool helps press it down. This keeps bubbles away. The design should sit flat. No raised edges should remain.
Checking Alignment
Look at the design from the front. Check if it sits straight in the frame. Small shifts can change the final look. Adjust it if something looks off. A slight lift and reset can fix the position. Press again once it looks even. Now the glass and design are ready for the next step.
Adding Wine Corks
Wine corks bring the main look to the shadow box. Place them one by one. Keep them clean and dry before use.
Arranging Corks Inside
Lay the corks inside the frame. Try different positions. Mix straight lines with small clusters. Fill gaps so the base looks full but not crowded. Keep some cork text facing forward. This adds simple detail without extra effort. Check spacing as you go. Small shifts make the layout look better.
Creating Visual Balance
Balance matters for a neat display. Spread corks evenly across the box. Avoid piling too many on one side. Use different cork sizes if you have them. Light gaps can help the design feel steady and easy on the eyes.
Adding Decorative Elements
Add small holiday items to finish the design. Tiny ornaments, ribbon pieces, or paper shapes work well. Place decorations between corks. Keep it light so the corks stay the main focus. A few touches are enough to complete the look.
Personalization Ideas
This part of the project makes the shadow box feel personal. Small details turn simple cork pieces into something meaningful. Each design choice adds a memory or a message. You can mix names, words, and dates to match the holiday mood
.
Names and Monograms
Add a name to each cork piece. Keep the letters clean and simple. A last name works well for a family display. A single first name also looks nice on a small shadow box. Monograms fit well with the Cricut Joy because the cuts stay neat and small.
Holiday Messages
Short holiday words fit best on cork. Use simple phrases like “Merry Christmas” or “Happy Holidays.” One word per cork keeps the design easy to read. Place the message across the center for a balanced look. This gives the shadow box a clear seasonal feel.
Special Dates and Quotes
Add a year or a special date to mark a memory. A wedding date or first holiday together works well. Short quotes also fit on cork pieces. Keep the text short so it stays readable. Each piece can hold one small message that adds meaning to the display.
Final verdict
This craft turns saved wine corks into a framed holiday piece with personal meaning. It uses basic materials and stays easy to manage at home. The final piece fits well in small spaces and works for seasonal display or gifting.
Cricut Joy brings clean cuts for letters and shapes. Vinyl details sit neatly on the glass and help the design stay clear. The machine supports steady work for beginners and hobby crafters.
The finished shadow box brings cork texture and vinyl design together in one frame. It fits well in living rooms, kitchens, or entry tables during the holiday season. Each piece carries personal touches that reflect shared moments and holiday memories.
FAQs:
What is a wine cork shadow box used for?
It is used for holiday decor. It turns wine corks into framed art. It can also hold memories from special moments.
What does Cricut Joy do in this project?
Cricut Joy cuts vinyl designs. It makes letters and shapes clean and neat. These pieces go on the glass for decoration.
What materials are needed?
A shadow box, wine corks, vinyl, transfer tape, and basic tools are needed. A Cricut Joy machine is also part of the setup.
How long does this project take?
It can be done in a short crafting session. Time depends on design details and cork arrangement.
Can beginners do this craft?
Yes. The steps are simple. The tools are easy to use and support clean results.
What type of vinyl works best?
Standard adhesive vinyl works well. It sticks smoothly to glass and holds the design in place.
How do you arrange corks?
Corks are placed inside the frame one at a time. Spacing stays even to keep the layout balanced.
Can this be used as a gift?
Yes. It works well as a holiday gift. The personal design makes it feel meaningful and special.