How to Make a Beautiful Gift Tag
Gift tags do more than label a present. A well-made tag adds charm and helps the gift feel more personal. Many people struggle with colors, shapes, fonts, and layouts. The final tag can look plain or messy, even after spending time on it. Still, gift tag design becomes much easier with a clear process.
Small choices like paper type, spacing, and decorative details can change the full look of a tag. This guide walks through each step, from choosing a style to printing and attaching the finished tag. You will also learn the difference between digital and handmade tags, common design mistakes, and simple ways to create gift tags that look clean and thoughtful.
What Are Gift Tags and Why They Matter
Gift tags are small cards or labels tied to a gift. They often include a name, short note, or greeting. Some people keep them simple. Others match them with the wrapping paper, ribbon, or theme. A gift tag may look small, yet it changes how a gift feels. A plain box can look warm and personal with the right tag. It also helps the receiver know the gift came with care.
Names are only one part of a gift tag. Color, shape, font, and texture also play a role. A soft floral tag gives a different feeling than a bold black-and-white one. That small detail helps set the mood before the gift is even opened. Gift tags also help during parties and holidays. They keep gifts organized and stop mix-ups. At the same time, they add style to the table or gift display. Some tags are playful. Some look clean and modern. Others feel handmade and cozy. The design depends on the moment and the person receiving the gift.
Why Personalized Gift Tags Are Worth It
Running a small business means doing a little bit of everything. One day, I’m packing orders late at night. The next day, I’m getting ready for a local market. During all of that, I still want my products to feel special once they reach a customer’s hands.
That is why I started using personalized gift tags. They seem small at first, yet they change the whole look of a package. A simple tag with a customer’s name, a short thank-you note, or my logo makes each order feel more personal. People notice those details right away. It also helps my brand look more polished and consistent across every order.
I noticed something else too. Customers started sharing photos of their packages online. The tags made the orders feel more gift-ready and thoughtful. That extra care helped people remember my shop. Some even came back to place another order a few weeks later.
The best part is that gift tags do not cost much. I did not need to change all my packaging or buy expensive materials. A custom tag gave my products a fresh look without adding a huge cost. I also like that I can use them for more than branding. Some tags include care tips, discount codes, QR codes, or short messages during seasonal sales.
Still, design work can take a lot of time. I used to spend hours trying to make tags look right. That became frustrating fast. I am not a designer, and I already have enough work to manage every day.
That is why Avery Design & Print Online became so helpful for me. The editable templates made the process simple. I could change colors, add my logo, and update text in just a few minutes. I did not need special design skills, and I could still make tags that matched my brand.
Now I use personalized gift tags for holiday orders, craft fairs, thank-you gifts, and online sales. They help my business feel more thoughtful and professional without adding extra stress to my day.
Understanding Gift Tag Design Basics
Gift tag design starts with a clear purpose. A gift tag shares a name, a short note, or a message. It also adds a personal touch to a gift. Shape matters in a gift tag. Some tags are round. Some are square. Some use simple cut shapes. The shape should match the gift style. Size also plays a role. A small tag fits small gifts. A larger tag works better for big boxes. The text must stay easy to read.
Color choice sets the tone. Soft colors feel calm. Bright colors feel lively. The color should not make the text hard to see. Typography affects clarity. Simple fonts work best. Letters should stay clear and spaced well. Material adds structure. Paper, cardstock, or textured sheets change the final look. Strong material helps the tag last longer. Space on the tag should stay open. Too much text makes it hard to read. A clean layout keeps the message clear.
How to make gift tags
How to make gift tags
Creating polished, personalized gift tags is simpler than it looks, especially when you start with a clear process. Whether you’re preparing packaging for a small business, seasonal gifts, or special events, the key is choosing a workflow that matches how you like to work.
Before you begin designing, Avery gives you two flexible starting points. You can either select the printable tag product first or start by browsing ready-made designs. Both paths lead to the same outcome, professionally printed, customized gift tags, the difference is only how you begin.
Step 1: Choose where you want to start
There’s no single “correct” way to begin your project. You can start from the product you plan to print on, or you can start from a design that inspires you. Both approaches are designed to make the process faster and more intuitive.
Option A: Start with a printable tag product (structured workflow)
If you already know the size, shape, or material you need, start by selecting your printable tag product first. Once chosen, click the blue template link on the product page to open the matching design environment. From there, you can select a layout, personalize your tag, and move directly into printing with a format that already fits your product.
This approach is especially useful for maintaining consistency across branded packaging or when producing tags in bulk for business use.
Option B: Start with a tag design (inspiration-first workflow)
If you prefer to start visually, browse the collection of ready-made tag designs and choose one that fits your style or occasion. Opening a design automatically loads the correct template in Avery Design & Print Online (ADPO), allowing you to move straight into customization.
This workflow is ideal when you want creative inspiration or need to quickly adapt designs for seasonal promotions, events, or limited-edition packaging.
What if you already have Avery tags from elsewhere?
Not every project starts from scratch. Many users already have Avery tags purchased from retailers like Amazon, Walmart, Staples, or Office Depot. In those cases, the easiest starting point is to locate the product number on the packaging and enter it into the Avery Template Finder.
The Template Finder instantly matches your product with the correct template, removing guesswork and ensuring your design fits perfectly; regardless of where the tags were purchased. From there, you can customize your design and print with confidence, knowing everything is aligned and ready to go.
Step 2: Select your layout
If you start by choosing your printable tag product, the next step is selecting a layout that matches the shape and structure of your tag. Layout options vary depending on whether your tag is rectangular, banner-style, scalloped, circular, or square.
Rectangular, banner, and scalloped-edge tags often give you more flexibility. You may be asked to choose an orientation such as tall or wide, along with whether you want to print on one side or both sides in a tall layout. These options are especially useful when you want to balance branding on the front with additional information; like care instructions, pricing, or short messages; on the back.
For evenly shaped tags like circles, squares, and scalloped circles, the process is usually simpler. You’ll typically just choose between single-sided or double-sided printing, which keeps the design process quick and focused.
Step 3: Choose your design
Once your layout is set, you can move on to selecting a design from the Avery gallery. The collection includes a wide range of styles, from seasonal and holiday-themed templates to clean minimalist layouts, rustic textures, bold modern designs, and playful creative options.
This step is where branding starts to take shape. Many users match their design to a specific occasion or brand identity. For example, seasonal markets often call for themed designs that can be adjusted with brand colors, while pop-culture or niche product lines may benefit from brighter, more expressive visuals that reflect the product’s personality.
Choosing the right design early helps set the tone for the rest of your customization and ensures consistency across your packaging or event materials.
Step 4: Create Your Design Layout
Your layout is the foundation of your gift tag design, setting the structure for everything that follows. Start by deciding how your information should be arranged; whether it’s a clean, minimal layout or something more layered and decorative. A balanced layout helps ensure your tag is easy to read while still visually appealing.
Think about hierarchy first. The most important detail, such as a name, brand, or occasion, should naturally draw the eye. Supporting details like messages, prices, or short notes should sit lower in priority. Keeping spacing consistent is key; too much clutter can make even the most beautiful design feel overwhelming. Before moving forward, always check alignment and spacing. A well-structured layout makes every later design step easier and ensures your final tag feels polished and intentional.
Step 5: Add Typography and Text
Typography plays a major role in the personality of your gift tag. Choose fonts that match the tone of your brand or occasion; clean and modern fonts for a minimal look, or script and decorative fonts for something more expressive and festive.
Limit your font choices to two or three styles to keep the design cohesive. Use contrast to guide attention, such as pairing a bold headline font with a simpler body font. This helps your message stay readable even at a small tag size. Pay close attention to spacing, letter size, and alignment. Since gift tags are compact, clarity matters just as much as style. A well-chosen font can instantly elevate your design and make it feel more professional.
Step 6: Add Decorative Elements
Decorative elements bring personality and visual interest to your gift tags. This can include icons, borders, illustrations, patterns, or subtle background textures that enhance your overall theme.
When adding design elements, focus on balance. Each element should support your message rather than compete with it. For example, a simple border can frame your text beautifully, while a small icon can reinforce a seasonal or brand theme without overwhelming the layout.
Color choice is also important here. Stick to a coordinated palette that reflects your brand or occasion to keep the design unified. Small, intentional decorative details often make the biggest difference in creating a memorable, high-quality look.
Step 7: Personalize your tags
Once your design opens in Avery Design & Print Online (ADPO), all workflows come together on the editing canvas. This is where your tag becomes fully customized and ready for printing. On the left-hand panel, you’ll find the main editing tools. You can upload logos or images, adjust fonts and colors, insert shapes or icons, and add QR codes or barcodes depending on your needs. These elements allow you to turn a basic template into a branded, functional tag.
On the right-hand side, you can control how changes are applied. The Edit All option is ideal for global updates like consistent branding, font changes, or background adjustments across every tag. The Edit One option allows you to personalize individual tags, which is especially useful for adding unique names, prices, or messages for events and product lines.
For larger projects, the Import Data or Mail Merge feature is a powerful time-saver. By connecting a spreadsheet of names, product details, or other information, ADPO automatically populates each tag individually. This makes it especially efficient for small businesses managing bulk orders, event tags, or product labeling systems. With these tools combined, personalization becomes scalable; allowing both one-off creative projects and high-volume production to be completed with the same level of consistency and control.
Step 8: Preview, print, and save your project
Once your design is complete, the final step is to preview and print your gift tags. Clicking Preview & Print in ADPO shows your full sheet layout exactly as it will appear when printed, giving you a final opportunity to review spacing, alignment, and overall design consistency.
At this stage, you’ll have two printing options:
- Print it yourself: Ideal for small batches, quick turnaround projects, or last-minute needs where flexibility matters.
- Let us print for you: Best for larger quantities or when you want a professionally finished result without handling printing at home.
Before printing, it’s always a good idea to download the PDF proof. This file acts as your final safety check, showing an accurate representation of how your tags will appear once printed and helping you catch any layout or spacing issues in advance.
If you’re printing at home, a few simple practices can make a big difference in quality and consistency:
- Set your print scale to 100% to prevent unwanted resizing or distortion.
- Run a test print on plain paper first, then hold it against your tag sheet to confirm alignment.
- Select the correct paper setting in your printer, such as “Labels,” “Cardstock,” or “Heavyweight,” depending on your material choice.
Taking these extra steps helps ensure your final tags look clean, professional, and properly aligned; whether you’re producing a small personal batch or preparing packaging for a full product run.
Step 9: Attach and Use Gift Tags
Once your tags are printed and cut, the final step is attaching them securely to your products or gifts. Choose an attachment method that suits your packaging style; string, ribbon, twine, or adhesive backing are all popular options depending on the look you want to achieve.
Make sure the tag is positioned clearly and doesn’t obstruct important product details. For retail or gifting, placement matters just as much as design, since it affects both visibility and presentation. Finally, think of your gift tag as part of the overall experience. A well-designed and properly attached tag doesn’t just label a product; it adds value, reinforces branding, and creates a more memorable unboxing or gifting moment.
Read also: How to Make a Gift Tag in Canva: Step by Step Guide
Digital vs Handmade Gift Tags
Gift tags can be made in different ways. Some people use screens and design tools. Others use paper and craft items. Both styles can look good and match different needs.
Here is a simple comparison.
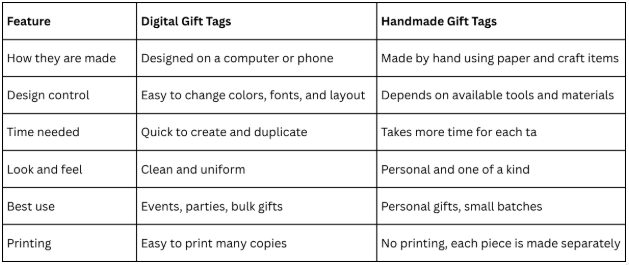
Both styles bring their own value. Digital tags work well for speed and consistency. Handmade tags bring a personal touch that feels close and thoughtful. MBoth styles bring their own value. Digital tags work well for speed and consistency. Handmade tags bring a personal touch that feels close and thoughtful. Many people even mix both ideas.
Common Gift Tag Design Mistakes
Some gift tags fail before they are even read. The problem often starts with design choices that make them hard to see or hard to understand. Tiny text is a common issue. Names and short messages should be easy to read at a glance. Small lettering forces people to squint or skip the message. Too many colors can also hurt the design. Bright shades everywhere can clash and distract from the message. A simple color set keeps the tag clear and pleasant to look at.
Busy backgrounds create another problem. Heavy patterns or crowded graphics can hide the text. The eye does not know where to focus, so the message gets lost. Some tags try to include too much information. Long sentences, extra quotes, or packed layouts make the tag feel cramped. A gift tag works best with short and simple wording.
Poor spacing is often ignored. Text placed too close to the edge or other design elements feels tight and uncomfortable. A bit of breathing space helps everything stand out. Font choice also matters. Decorative fonts can look nice, but they are hard to read in small sizes. Clear lettering keeps the message strong and easy to understand. A gift tag should guide the eye, not compete for attention. Simple choices usually create the strongest result.
Final Words:
Gift tags may be small, but they change how a gift feels. A clear design makes the message easy to read. It also adds care to every package. Simple choices make the work easier. Clean fonts, open space, and balanced colors help each tag look neat. Practice builds confidence over time. Each new tag becomes easier to design. Good design comes from clear choices and steady practice.
FAQs:
What size should a gift tag be?
Small tags work for tiny gifts like jars or bags. Medium tags fit most boxes. Large tags suit big packages.
What material works best for gift tags?
Cardstock is a strong choice. It holds shape well. Regular paper works for light use or short events.
How can I make gift tag text easy to read?
Use clear fonts with enough space between letters. Keep words short. Avoid crowded layouts.
Can gift tags be printed at home?
Yes. Home printing works well for small batches. Thick paper gives better results. Test print helps check alignment.
What should I write on a gift tag?
A name works for most gifts. A short note or greeting also fits. Keep the message short.
How do I attach gift tags to gifts?
String, ribbon, and twine are common choices. Some tags also use sticky backing for quick placement.
any people even mix both ideas.