How to Make a DIY Paper Cut Shadow Box
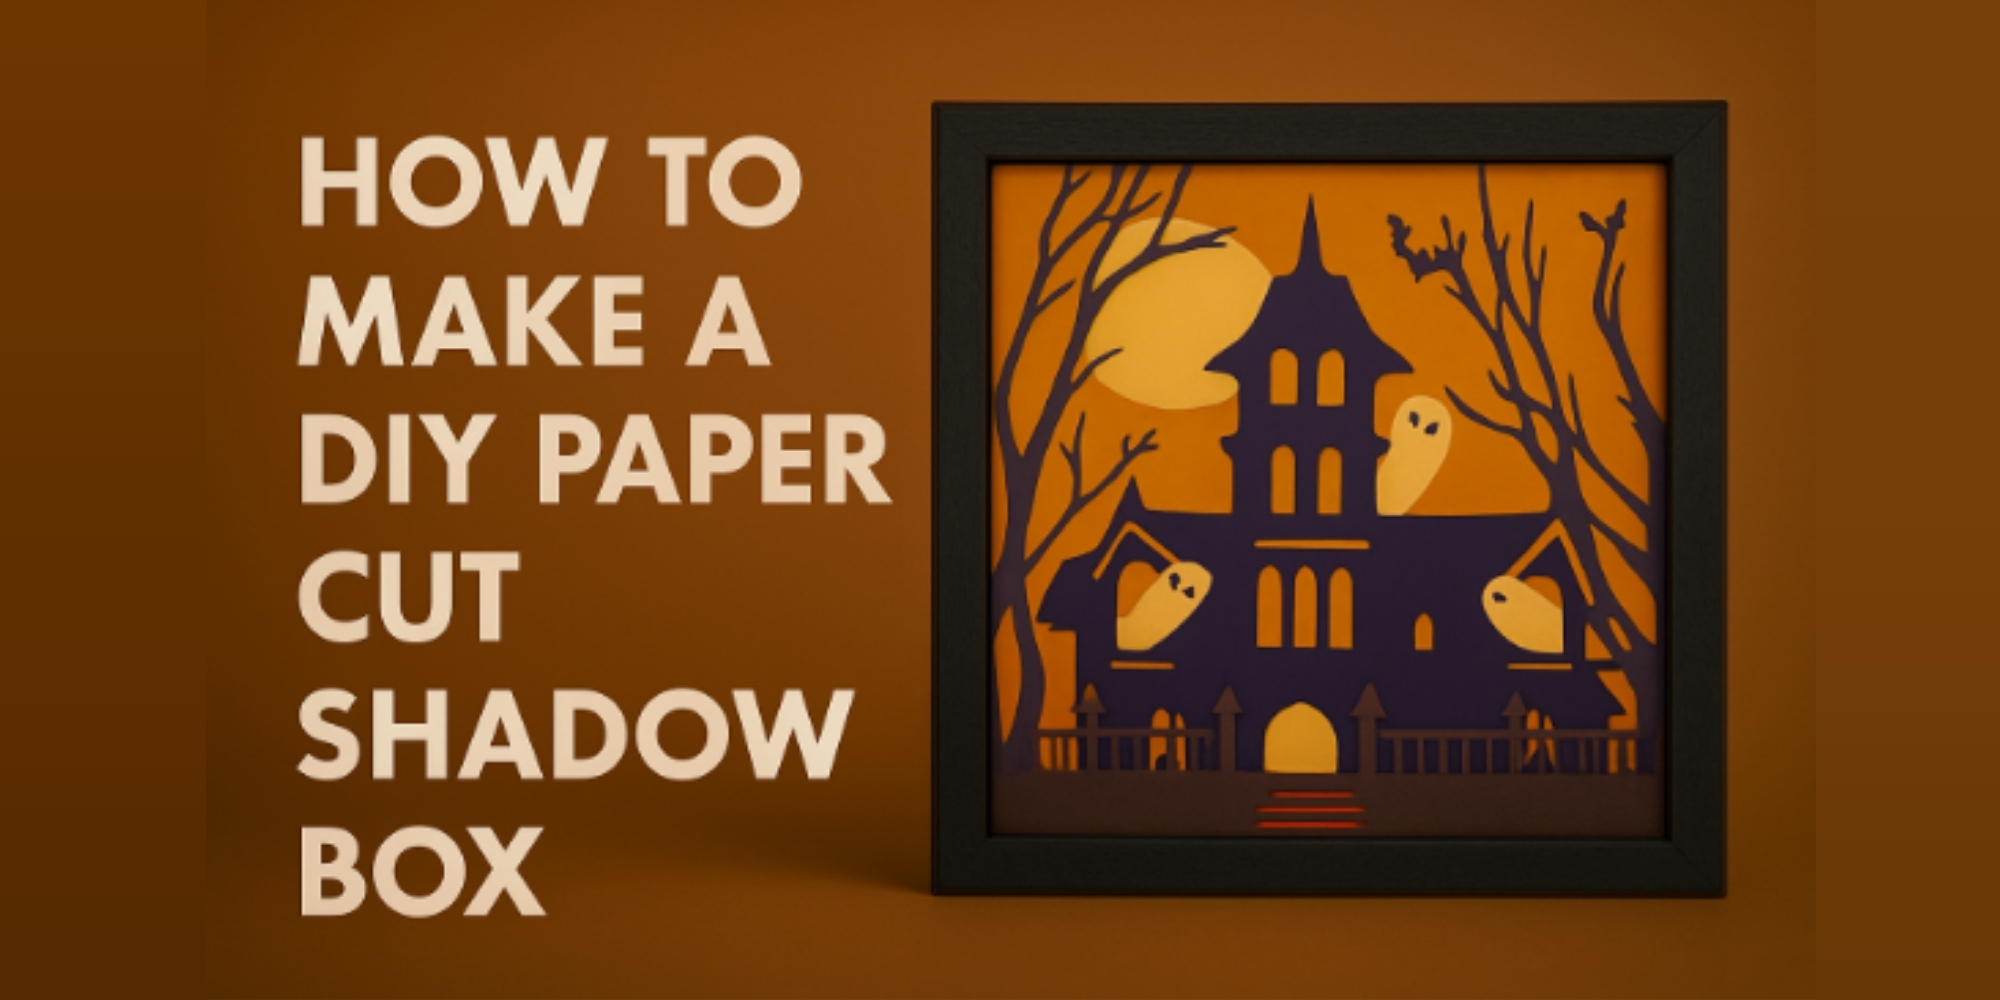
Struggling to find a creative way to display your favorite memories? A DIY paper cut shadow box offers a fresh, fun option that anyone can try.
This craft uses layered paper designs to create depth and style, turning simple materials into eye-catching art. You don’t need fancy tools or skills, just a bit of patience and creativity. If you’d like to explore other creative ideas, you can also check out how to make a perfect DIY shadow box
By following this guide, you’ll learn each step clearly, from choosing designs to assembling your shadow box. It’s a project that adds a personal touch to any room or gift.
Ready to start crafting something special? Visit ArtBubbles.com for more creative ideas and keep reading to discover how easy and rewarding making your own paper cut shadow box can be.
What is a Spacer Layer?
A spacer layer is the material placed between the white cardstock layers in a paper cut shadow box. It creates space that lets light pass through, making the design look three-dimensional. This gap helps each layer stand out and adds depth to the final piece.
If you’re curious about different frame types, our tutorial on how to make a DIY shadow box frame can help you pick the right option for your project.
Three common spacer materials work well for this:
- Foam board: About 3/16 inch thick, cut into half-inch strips. It gives strong and even spacing, perfect for projects with several layers. For example, in a four-layer design, foam strips keep everything steady and separated nicely.
- Scotch double-sided mounting tape: Easy to use and sticks well. It’s thinner but works for simpler designs or fewer layers.
- Zots 3D dots: Small adhesive dots that add subtle spacing. They’re good for delicate or detailed areas.
If cutting foam strips feels tricky, you can double up the tape instead. This keeps the layers apart without extra tools. Choosing the right spacer depends on your project’s size and how many layers you want to stack.
Make a DIY Paper Cut Shadow Box with These Steps
Making a DIY paper cut shadow box is easier than it seems. Follow the right steps, and you can create a beautiful layered design. Keep reading to see the step-by-step process and get started on your own project.
For more creative ways to display your treasures, you can also learn how to make a shadow box to display precious possessions.
Step 1: Make Your Design
Start by sketching a small thumbnail of the scene you want inside your shadow box. This quick drawing helps you see how the layers will stack and where each element belongs. It’s a simple way to plan the layout without spending too much time on details. You can adjust spacing, fix overlaps, and get a rough idea of how your scenery will look once it’s built.
Once the thumbnail feels right, it’s time to create the actual design. You can draw it by hand if you prefer sketching. If drawing isn't your strong suit, use a computer to design and print the layout. Many people find it easier to work with silhouette images that match their theme. These can be arranged digitally to build up the layers of your scene.
Decide how many layers you want. For a detailed design, four or more layers work well. Some designers like to add special effects, like making the last layer a reflection by flipping it upside down. While placing silhouettes, ensure every piece is attached somewhere. Avoid floating objects by linking each item to a frame edge, the ground, or another solid part of the scene.
Adding a frame border around every layer will give extra spots to anchor your objects. As you design, place all layers together from time to time to check their alignment. This helps ensure that no important details get hidden behind the wrong layer. Color-code the layers temporarily to keep track of them while working.
After finishing your design, print each layer on paper. Place them against a window, tape white cardstock over them, and trace the outlines clearly. This will give you clean, ready-to-cut layers for your shadow box.
Step 2: Size Your Shadow Box Art Template
Adjust the template by unlocking the width and height boxes to type your desired size, or drag the corner arrow to resize it freely. For better control, turn on grid lines or rulers. This helps align your design perfectly inside the frame, keeping everything centered and neat.
Step 3: Cut Your Layers
Begin cutting the traced layers using a sharp X-Acto knife. Go slowly and focus on accuracy, especially around narrow joints where mistakes can happen. Remove any parts you no longer need and use an old surface to protect your workspace from scratches.
For tiny cuts, place a small piece of double-sided tape under delicate sections to keep them steady. You can also hold the piece gently with tweezers as you cut, preventing small bits from shifting or flying away.
Step 4: Glue the Layers
Start by cutting strips of acid-free foam board to place between each paper layer. Foam board holds its shape better than cardboard and prevents sagging over time. You can cut long strips that match the sides of your layers, or build a full foam board frame for each one, depending on your materials.
Make the foam board frame slightly thinner than the outer edge of the paper layer. This keeps the spacer hidden when the shadow box is viewed from the side. A small difference in width helps the layers float without exposing the foam.
Begin by gluing foam strips around the back edge of the first layer. Press gently to avoid bending the paper. Place the second layer on top, aligning it carefully, then glue another set of spacers to its back. Repeat this stacking and gluing process for all remaining layers.
Foam board spacers create a clean and even gap that allows light to pass through. The layered design becomes crisp and stable, enhancing the depth of your shadow box.
Step 5: Assemble Your Paper Art Design Inside the Frame
Start by choosing what you want to display between the layered papers. Cut your design to fit tightly within the frame so it stays in place without shifting. A snug fit means you won't need much glue or tape to hold the layers together securely.
Use scotch-type tape to connect foam board pieces behind your layers. You can glue the paper to the foam boards if you prefer, but taping is often enough. Stack the layered paper art with the taped foam boards and carefully place them into the frame, keeping everything aligned.
For a unique touch, add a soft patterned cardstock as the back layer. This subtle background texture makes your design pop and gives the finished piece a richer, more layered appearance.
Step 6: Make the Box
To protect your layered scene, you need to build a sturdy box around it. You can buy a ready-made box if you find one that fits. But making your own from cardboard gives you full control over the size and look. This way, you can adjust the box to match the thickness of your layers and make space for lighting at the back.
Start by cutting four strips of cardboard. Make sure all strips have the same width, wider than your layered scene’s depth. This extra width leaves room at the back for the LED strip. Cut two strips as long as the longest side of your scene, adding the cardboard thickness. The other two strips should match the shorter side plus the cardboard thickness. These measurements help the strips fit snugly when assembled.
At one end of each strip, measure the cardboard thickness and draw a line. Cut along this line with a craft knife but do not cut all the way through. Leave the bottom layer intact so the cardboard can fold cleanly without breaking apart.
Apply glue to the ends and join the strips perpendicularly to form a rectangle. This method neatly hides the raw edges of the cardboard, giving the box a smooth outer finish.
For a cleaner inside look, line the box interior with white or patterned paper. This hides the rough cardboard surface and adds a bright, polished feel to your scene.
Step 7: Make the Box Make the Back and the Frame
Cut a cardboard rectangle that fits perfectly into the box to create the back panel. You can paint it white or cover it with plain white paper for a clean background. Next, draw a frame on another piece of cardboard that matches the size of your box and carefully cut it out. Paint the frame white if the cardboard isn’t already white.
For a creative upgrade, use patterned scrapbook paper instead of plain white on the back panel. Soft textures or subtle prints can enhance the display and give your shadow box a more polished look.
Step 8: Place your layered project in the Shadow Box Frame
Start by placing your layered design inside the shadow box frame. Make sure each layer is in the correct order. Adjust them gently to align the edges and ensure the overall design looks balanced.
Take your LED light strip and plan where the power cord will exit from the bottom. You might need to cut a small notch in the backing of the frame. This helps the cord fit through without bending or crimping.
Before securing the light strip, do a dry run by placing it along the inner edge of the frame. Don’t peel off the adhesive backing yet. This step helps you visualize how the lights will wrap around the design.
Begin wrapping the light strip around the inside of the frame. Keep looping it until you feel the brightness is enough. Most shadow boxes need around 16 feet of LED strip to create a vibrant glow.
Once wrapped, attach the backing of the frame and plug in the lights. This is a good time to check how the display looks when illuminated. Make small adjustments if needed.
If you notice light leaking through small gaps at the frame's edge, seal them with washi tape. Choose a color that blends well with your design to keep it neat and hidden.
For a cleaner look, use small clear adhesive mounting clips on the back of the frame. These clips will hold the power cord in place and prevent it from dangling or showing.
Finally, if slight light gaps don’t bother you, you can leave them as they are. Sometimes, the soft glow adds character to the shadow box's overall effect.
Step 9: Insert the Scenery and Create a 3D Effect Inside the Box
Apply a thin line of glue along the inner edges of the shadow box. Carefully place your scenery inside and gently press it down until it sits in the right position. Leave a small gap at the top so the scenery does not touch the front frame.
For added depth, glue a thin spacer block behind the scenery. This will push the scene slightly forward, creating a soft shadow effect in the background. It makes the display feel more dimensional and gives a layered, professional finish.
Cut a small slit at the back corner of the box for any cables to pass through. Finally, glue the cardboard frame on top to complete the shadow box design.
Step 10: Add the LED Strip
Start by measuring the inside edges of your shadow box to cut the LED strip to the exact length. Stick the strip along the inner frame, beginning near the slit where the power cable will exit. This placement keeps the light evenly distributed and hides wiring neatly.
Connect the LED strip to a power source. You can either use a plug-in adapter for ease or solder the connection for a cleaner finish. Once done, place the back panel with its white side facing inward to block any brown spots from showing through the layers.
For extra convenience, choose LED strips that include a remote control. This allows you to adjust brightness or change colors without opening the box, giving flexibility for different moods.
Step 11: Light On
Switch on your shadow box and watch how the light filters through each layer of card stock, creating a rich, layered glow. Using warm white LED lights adds a soft, cozy tone that highlights textures gently, avoiding any harsh glare.
Shadow Box Paper Art with Lights Tips
Adding lights to your paper shadow box can turn a simple design into a glowing display. The soft glow highlights each paper layer, creating a cozy depth that feels alive. Even basic designs start to pop once you light them from behind. If you’d like to push this further, try a 3D layered paper craft shadow box design for even more depth and stunning results.
Placement of the lights matters just as much. You can tuck LED strips along the inner edges or place tiny fairy lights around the frame. This spreads the light evenly and avoids harsh bright spots that can distract from your scene.
There are many simple tricks to make your lighting clean and polished. If you want a full guide on choosing the right lights, hiding cords, and setting the perfect glow, visit our detailed blog on Shadow Box Paper Art with Lights Tips.
Conclusion
Making your own shadow box is not hard when you take it step by step. You build each layer, add light, and shape the scene to match your style. Every small detail you place turns a simple box into a glowing piece of art.
Once it’s done, you’ll see how paper, light, and a little care create something special. This project is not just a craft; it’s a calm way to bring art to life in your space. Enjoy the glow and the depth you’ve made with your own hands.
For inspiration and ready-made designs, check out our curated Shadow Box SVGs at ArtBubbles.